 Image credit:
 Build a CRUD Django REST API using Django Rest Framework
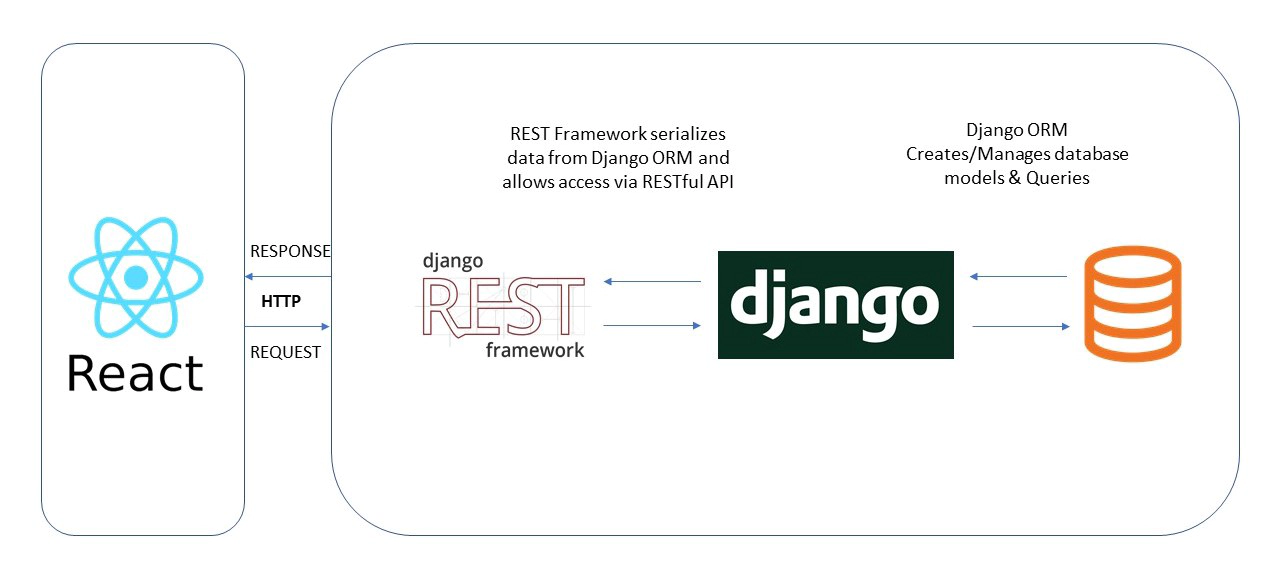
The reason I love Django Rest Framework (DRF) is because it elegantly handles data serialization and seamlessly works with Django’s ORM. DRF complements Django by providing a means of converting it’s models to a RESTful format.
Here, we will create a fully working Todo CRUD (Create, Read, Update and Destroy) Django REST APIs using Django and Django rest framework (DRF).
Django is a Python web framework that simplifies common practices in web development. Django is reliable and also has a vibrant ecosystem of stable libraries supporting common development needs.
Django REST framework (DRF) is a powerful and flexible toolkit for rapidly building RESTful APIs based on Django models.
Setting up Python 3 Environment
To verify if Python is installed and configured correctly on your system, Open the terminal and type in the command python --version else you’ll need to install Python 3.6+ on your system.
$ python --version
Python 3.8.5
Creating the Todo project
We will start by creating our project’s work directory and a virtual environment for our project. The virtual environment makes it possible to run our project and its dependencies in an isolated environment.
Run mkdir django_crud to create our working directory.
$ mkdir django_crud
$ cd django_crud
-
To create a virtual environment for our project run:
$ python -m venv envenvis the name of our virtual environment -
To activate the virtual environment for our projected run:
$ .\env\Scripts\activate -
Now, install
djangoin our virtual environment:$ pip install django
Let’s create our project now by running the below command.
$ django-admin startproject django_todo_api
After successfully creating the project, navigate into the newly created django_todo_api directory:
$ cd django_todo_api
Create a new Application
Now, start a new application called todo:
$ python manage.py startapp todo
The command above creates a directory named todo and generates boilerplate code for a todo app.
Starting up the Server
Run migrations:
$ python manage.py migrate
And start up the server:
$ python manage.py runserver
Navigate to http://localhost:8000 in your web browser:
At this point, you will see an instance of a Django application running successfully. Once you are finished, you can stop the server (CTRL+C).
Registering the todo Application
Now we can register our todo app into our django_todo_api project.
Open django_todo_api/settings.py in the project directory django_todo_api and add our todo app to the INSTALLED_APPS list.
...
INSTALLED_APPS = [
    ...
    'django.contrib.messages',
    'django.contrib.staticfiles',
    'todo'
]
Creating the Todo model
In Django, models are python classes that represent a table in the database.
The Todo Model represents a Todo table in the database that gets created by Django whenever we run the command python manage.py migrate.
Open the todo/models.py file in your code editor and add the following lines of code:
from django.db import models

# Create your models here.

class Todo(models.Model):
    title = models.CharField(max_length=100)
    completed = models.BooleanField(default=False)

    def _str_(self):
        return self.title
The code snippet above describes two properties on the Todo model:
titlecompleted
The completed property is the status of a task. A task will either be completed or not completed at any time.
Because you have created a Todo model, you will need to create a migration file:
$ python manage.py makemigrations todo
And apply the changes to the database:
$ python manage.py migrate todo
To get a better understanding of the Django migrations, read the documentation here.
Setting Up the APIs
Now, we will create an API using the Django REST framework.
Install the djangorestframework and django-cors-headersin our virtual environment.
   $ pip install djangorestframework
   $ pip install django-cors-headers
You need to add rest_framework and corsheaders to the list of installed applications.
Open the django_todo_api/settings.py file in your code editor and update the INSTALLED_APPS and MIDDLEWARE sections:
INSTALLED_APPS = [
    ...
    'django.contrib.messages',
    'django.contrib.staticfiles',
    'corsheaders',
    'rest_framework',
    'todo',
]

MIDDLEWARE = [
    ...
    'django.contrib.messages.middleware.MessageMiddleware',
    'django.middleware.clickjacking.XFrameOptionsMiddleware',
    'corsheaders.middleware.CorsMiddleware',
]
Then, add these lines of code to the bottom of the django_todo_api/settings.py file:
CORS_ORIGIN_WHITELIST = [
     'http://localhost:3000'
]
django-cors-headers is a Python library that will prevent the errors that you would normally get due to CORS rules. In the CORS_ORIGIN_WHITELIST code, you whitelisted http://localhost:3000 because you want the frontend (which will be served on that port) of the application to interact with the API.
Serializing the Todo model
You will need serializers to convert model instances to JSON so that the frontend can work with the received data.
Create a todo/serializers.py file with your code editor. Open the serializers.py file and update it with the following lines of code:
from rest_framework import serializers
from .models import Todo

class TodoSerializer(serializers.ModelSerializer):
    class Meta:
        model = Todo
        # fields = ('id', 'title', 'completed')
        fields = "__all__"
The above code specifies the model to work with and the fields to be converted to JSON.
Creating the View
In the todo/views.py file, we are going to write the logic for the CRUD functionality for our app. Django Rest framework comes with inbuilt classes that make building the CRUD functionality very easy.
from django.shortcuts import render
from rest_framework import viewsets
from .serializers import TodoSerializer
from .models import Todo

# Create your views here.

class TodoView(viewsets.ModelViewSet):
    serializer_class = TodoSerializer
    queryset = Todo.objects.all()
The viewsets base class provides the implementation for CRUD operations by default.
One step further is the ModelViewSet, which is an extension of the viewsets for when you are working with Django models. Just specifying a serializer_class and a queryset you have all the CRUD operations of the viewsets ready to go.
A viewset that provides default methods for CRUD operations that can be mapped as below:
| ENDPOINT | METHOD | ACTION | DESCRIPTION |
|---|---|---|---|
| todo/api/v1/todos | GET | list() | Get all tasks |
| todo/api/v1/todos | POST | create() | Create new task |
| todo/api/v1/todos/:id | GET | retrive() | Get task details |
| todo/api/v1/todos/:id | PUT | update() | Update task |
| todo/api/v1/todos/:id | DELETE | delete() | Delete task |
Creating URL paths for our endpoints
There are several ways to configure urls for viewsets. We can write individual urls for each operation. But we will do it more smartly using routers.
routers automatically generate URL patterns and routes for CRUD (create/retrieve/update/destroy) style actions. We no longer need to deal with wiring up the URL conf ourselves.
Create a todo/urls.py file with your code editor. Open the urls.py file and add the contents with the following lines of code:
from django.contrib import admin
from django.urls import path, include

from rest_framework import routers
from todo import views

router = routers.DefaultRouter()
router.register(r'todos', views.TodoView, 'todo')

urlpatterns = [
    path('api/v1/', include(router.urls)),
]
Now we will include this URL patterns in project URL configurations so that the django_todo_api project can be aware of the todo app URLs.
from django.contrib import admin
from django.urls import path, include

urlpatterns = [
    path('admin/', admin.site.urls),
    path('todo/', include('todo.urls')),
]
This was the final step that completes the building of the API.
Testing the endpoints
Let’s restart the server and start testing our APIs:
$ python manage.py runserver
Navigate to http://localhost:8000/todo/api/v1/todos in your web browser:
You can LIST all task & CREATE a new task using this interface:

You can also perform DELETE and UPDATE operations on specific task items using the id primary keys.
Add 1 to the URL to examine the task item with the id of 1. Navigate to http://localhost:8000/todo/api/v1/todos/1 in your web browser:

Documenting our endpoints
It’s a good practice to provide documentation for the endpoints that we create, this makes it easier for other people to use our API endpoints.
We will use coreapi to document our endpoints, install coreapi in our environment:
$ pip install coreapi
Add coreapi to the INSTALLED_APPS in django_todo_api/settings.py:
INSTALLED_APPS = [
    ...
    'django.contrib.messages',
    'django.contrib.staticfiles',
    'corsheaders',
    'rest_framework',
    'coreapi',
    'todo',
]
Also add the rest framework configuration to enable documentation autogeneration in django_todo_api/settings.py:
REST_FRAMEWORK = {
    'DEFAULT_SCHEMA_CLASS': 'rest_framework.schemas.coreapi.AutoSchema'
}
Open the todo/urls.py file and add docs URL:
from django.contrib import admin
from django.urls import path, include
from rest_framework.documentation import include_docs_urls

from rest_framework import routers
from todo import views

router = routers.DefaultRouter()
router.register(r'todos', views.TodoView, 'todo')

urlpatterns = [
    path('api/v1/', include(router.urls)),
    path('docs/', include_docs_urls(title='Todo API')),
]
By navigating to http://localhost:8000/todo/docs/ in the browser we’ll be able to see the full documentation of our Todo CRUD API endpoints.
Conclusion
Here I have given you a good introduction to Django and how to create CRUD RESTful APIs with Django Rest Framework (DRF). There is much more to learn and do with Django, but I hope you feel confident delving in and playing around with Django yourself now.
Go ahead and clone the repos django_todo_api to view the full source code of the project.
Have fun building some new APIs!
Releted Posts

Improving Business Processes using Machine Learning
Imagine your business has a contact form on its website. Every day you get many messages from the form, many of which are actionable, but it’s easy to fall behind on dealing with them since different employees handle different queries.
Read more
Sentiment Analysis on Earnings Call Transcript
Earning call is a conference call between executives and major investors where they discuss their quarterly financial performance and future outlook.
Read more
Time Series Forecasting using Facebook Prophet
Forecasting with time series models can be used by businesses for many purposes, for example, to optimise sales, improve supply chain planning and many other.
Read more